# 集成方案&消息&适配
# 集成方案
Flutter中有一些比较成熟的集成方案,即包含:
- 状态管理
- 依赖管理
- 存储
- 路由
- 国际化
- 过渡效果
- ....
# GetX

官方地址:https://pub.dev/packages/get (opens new window)
特点:
- 状态管理、路由、依赖管理
- 过渡动画、国际化
- HTTP请求
- 页面导航
- 本地状态、服务、响应、组件管理
# velocity_x

官方地址:https://pub.dev/packages/velocity_x (opens new window)
特点如上图。
# WebSocket消息
Flutter中有两个WS支持的包:
- web_socket_channel
- socket_io_client
# 安装依赖
dependencies:
  web_socket_channel: ^2.1.0
# websocket初始化
添加ws连接的配置信息到config.dart:
enum Env { Dev, Prod }

class Config {
  // ..
  static const String wsUrl = 'ws://192.168.31.132:3001';
}
使用自己本地的IP,注意协议是
ws。
创建文件utils/websocket_utils.dart:
import 'package:web_socket_channel/io.dart';

class WebSocketUtils {
  final String url;
  final Function? onOpen;
  final Function? onMessage;
  final Function? onError;
  final Iterable<String>? protocols;
  final Map<String, dynamic>? headers;

  // 初始化
  WebSocketUtils(
    this.url, {
    this.onOpen,
    this.onMessage,
    this.onError,
    this.protocols,
    this.headers,
  }) {
    // 这里是构造函数的函数体,可以直接完成初始化
    openSocket();
  }

  IOWebSocketChannel? _websocket;
  // Function? onOpen;
  // Function? onMessage;
  // Function? onError;

  // void initWebSocket(
  //     {Function? onOpen, Function? onMessage, Function? onError}) {
  //   this.onOpen = onOpen;
  //   this.onMessage = onMessage;
  //   this.onError = onError;
  //   // 连接 -> 接收消息
  //   openSocket();
  // }

  void openSocket() {
    _websocket = IOWebSocketChannel.connect(Uri.parse(this.url));
    if (onOpen != null) onOpen!();
    // 获取WebSocket的连接消息
    _websocket!.stream.listen((event) {
      print('event is 👉 $event');
      if (onMessage != null) onMessage!(event);
    }, onError: (err) {
      print('err is 👉 $err');
    }, onDone: () {
      print('close websocket');
      // todo 断线重连
    });
  }

  // 发送消息
  // 关闭连接
  // 断线重连
  // 心跳检测
}
在main.dart中完成初始化:
void main() async {
  setupGetIt();
  getIt.registerSingleton<WebSocketUtils>(WebSocketUtils(Config.wsUrl));
  // WebSocketUtils webSocketUtils = getIt<WebSocketUtils>();
  runApp(MyApp());
}
# 发送消息
// 发送消息
void sendMessage(String message) {
  if (_websocket != null) {
    _websocket!.sink.add(message);
  }
}
# 心跳检测
调整openSocket方法:
void openSocket() {
  _websocket = IOWebSocketChannel.connect(Uri.parse(this.url));
  if (onOpen != null) onOpen!();
  // 获取WebSocket的连接消息
  _websocket!.stream.listen((event) {
    print('event is 👉 $event');
    try {
      Map<String, dynamic> data = json.decode(event) as Map<String, dynamic>;
      if (data['event'] == 'heartbeat') {
        // 心跳检测
        sendMessage(json.encode({'event': 'heartbeat', 'message': 'pong'}));
      }
      if (onMessage != null) onMessage!(data);
    } catch (err) {
      print('err is 👉 $err');
    }
    // finally {
    //   if (onMessage != null) onMessage!(event);
    // }
  }, onError: (err) {
    // todo
    print('close websocket');
  });
}
# 断线重连
断线需要每隔一段时间进行重连,这里就需要有一个计时器
class WebSocketUtils {
  // ...
  Timer? _reconnectTimer;

  void openSocket() {
    _websocket = IOWebSocketChannel.connect(Uri.parse(this.url));
    if (_reconnectTimer != null) {
      _reconnectTimer?.cancel();
      _reconnectTimer = null;
    }
    if (onOpen != null) onOpen!();
    // 获取WebSocket的连接消息
    _websocket!.stream.listen((event) {
      // ..
    }, onError: (err) {
      print('err is 👉 $err');
      if (onError != null) onError!(err);
      reconnect();
    }, onDone: () {
      // onDone
      print('close websocket');
    });
  }

  // 断线重连
  void reconnect() {
    _reconnectTimer = Timer.periodic(Duration(seconds: 5), (timer) {
      openSocket();
      print('重新连接中');
    });
  }
}
# 关闭连接
其实代码比较简单:
// 关闭连接
void closeSocket() {
  if (_websocket != null) {
  	_websocket!.sink.close();
  }
}
主要是控制sink进行close(自带方法)即可。
# 完整代码
import 'dart:async';
import 'dart:convert';

import 'package:web_socket_channel/io.dart';

enum SocketStatus {
  connected,
  error,
  closed,
}

class WebSocketUtils {
  final String url;
  final Function? onOpen;
  final Function? onMessage;
  final Function? onError;
  final Iterable<String>? protocols;
  final Map<String, dynamic>? headers;
  Timer? _reconnectTimer;
  // ignore: close_sinks
  StreamController<SocketStatus> _controller = StreamController<SocketStatus>();
  SocketStatus _socketStatus = SocketStatus.closed;

  Stream<SocketStatus> get statusStream => _controller.stream;
  SocketStatus get socketStatus => _socketStatus;

  // 初始化
  WebSocketUtils(
    this.url, {
    this.onOpen,
    this.onMessage,
    this.onError,
    this.protocols,
    this.headers,
  }) {
    openSocket();
  }

  IOWebSocketChannel? _websocket;
  // Function? onOpen;
  // Function? onMessage;
  // Function? onError;

  // void initWebSocket(
  //     {Function? onOpen, Function? onMessage, Function? onError}) {
  //   this.onOpen = onOpen;
  //   this.onMessage = onMessage;
  //   this.onError = onError;
  //   // 连接 -> 接收消息
  //   openSocket();
  // }

  void openSocket() {
    _websocket = IOWebSocketChannel.connect(Uri.parse(this.url));
    _controller.sink.add(SocketStatus.connected);
    _socketStatus = SocketStatus.connected;
    if (_reconnectTimer != null) {
      _reconnectTimer?.cancel();
      _reconnectTimer = null;
    }
    if (onOpen != null) onOpen!();
    // 获取WebSocket的连接消息
    _websocket!.stream.listen((event) {
      print('event is 👉 $event');
      try {
        Map<String, dynamic> data = json.decode(event) as Map<String, dynamic>;
        if (data['event'] == 'heartbeat') {
          // 心跳检测
          sendMessage(json.encode({'event': 'heartbeat', 'message': 'pong'}));
        }
        if (onMessage != null) onMessage!(data);
      } catch (err) {
        print('err is 👉 $err');
      }
      // finally {
      //   if (onMessage != null) onMessage!(event);
      // }
    }, onError: (err) {
      print('err is 👉 $err');
      _controller.sink.add(SocketStatus.error);
      _socketStatus = SocketStatus.error;
      if (onError != null) onError!(err);
      reconnect();
    }, onDone: () {
      _controller.sink.add(SocketStatus.closed);
      _socketStatus = SocketStatus.closed;
      print('close websocket');
    });
  }

  // 发送消息
  void sendMessage(String message) {
    if (_websocket != null) {
      _websocket!.sink.add(message);
    }
  }

  // 关闭连接
  void closeSocket() {
    if (_websocket != null) {
      _websocket!.sink.close();
    }
  }

  // 断线重连
  void reconnect() {
    _reconnectTimer = Timer.periodic(Duration(seconds: 5), (timer) {
      openSocket();
      print('重新连接中');
    });
  }

  // 手动销毁controller与socket,帮助回收内存
  dispose() {
    _controller.sink.close();
    closeSocket();
  }
}
# 本地消息推送
本地消息推送第三方方案flutter_local_notifications,它是一个跨平台的本地化消息推送方案,官方网址https://pub.dev/packages/flutter_local_notifications (opens new window)。
平台支持:
- 安卓4.1以上。使用NotificationCompat APIs,所以可以运行旧的Android设备。
- iOS 8.0以上。在超过10的iOS版本上,该插件将使用UILocalNotification APIs。UserNotification APIs(又称用户通知框架)在iOS 10或更新的版本上使用。
- macOS 10.11以上。在10.14之前的macOS版本上,该插件将使用NSUserNotification APIs。UserNotification APIs(又称用户通知框架)在macOS 10.14或更新版本上使用。
- Linux。使用桌面通知规范。
# 安装依赖
dependencies:
  flutter_local_notifications: ^9.2.0
使用flutter pub get安装依赖。
iOS配置,在iOS项目的ios/Runner/AppDelegate.m或者ios/Runner/AppDelegate.swift文件中的didFinishLaunchingWithOptions方法中加入以下几行
Objective-C:
if (@available(iOS 10.0, *)) {
  [UNUserNotificationCenter currentNotificationCenter].delegate = (id<UNUserNotificationCenterDelegate>) self;
}
Swift:
if #available(iOS 10.0, *) {
  UNUserNotificationCenter.current().delegate = self as? UNUserNotificationCenterDelegate
}
以上的代码一定要加在
return语句之前。
# 基础示例
初始化需要完成的工作:
初始化FlutterLocalNotifications插件;
初始化消息
设置android图标;
这里要注意,
android目录中有一个目录android/app/src/main/res,在res就有图标了。获取权限
接收消息回调
消息初始化(ios与android平台)
回调方法定义:显示消息、点击消息
配置文件config.dart记录通用信息:
enum Env { Dev, Prod }

class Config {
  static const String baseUrl = 'http://192.168.31.132:3000';
  static const String wsUrl = 'ws://192.168.31.132:3001';
  static const Env env = Env.Dev;
  static const String publicDBName = 'public.db';
  static const String privateDBName = 'private.db';
  static const String channelId = 'com.toimc.community.im';
  static const String channelName = 'toimc技术社区';
  static const String channelDesc = 'toimc技术社区消息';
}
新建一个工具类文件utils/notifications_utils.dart:
// ignore_for_file: close_sinks

import 'dart:async';

import 'package:flutter_local_notifications/flutter_local_notifications.dart';
import 'package:my_app/config.dart';
import 'package:my_app/entity/msg/received_notification.dart';

class NotificationsUtils {
  // 初始化plugins
  FlutterLocalNotificationsPlugin flutterLocalNotificationsPlugin =
      FlutterLocalNotificationsPlugin();
  final StreamController<ReceivedNotification>
      didReceiveLocalNotificationStream =
      StreamController<ReceivedNotification>();
  final StreamController selectNotificationStream = StreamController();

  // 初始化消息
  initNotifications() async {
    // 设置android icon
    const AndroidInitializationSettings initializationSettingsAndroid =
        AndroidInitializationSettings('@mipmap/ic_launcher');
    // 请求权限
    final IOSInitializationSettings initializationSettingsIOS =
        IOSInitializationSettings(
      requestSoundPermission: false,
      requestBadgePermission: false,
      requestAlertPermission: false,
      // 接收消息回调
      onDidReceiveLocalNotification: onDidReceiveLocalNotification,
    );
    final MacOSInitializationSettings initializationSettingsMacOS =
        MacOSInitializationSettings(
            requestAlertPermission: false,
            requestBadgePermission: false,
            requestSoundPermission: false);
    final InitializationSettings initializationSettings =
        InitializationSettings(
            android: initializationSettingsAndroid,
            iOS: initializationSettingsIOS,
            macOS: initializationSettingsMacOS);
    // 消息初始化
    await flutterLocalNotificationsPlugin.initialize(initializationSettings,
        // 点击消息的回调
        onSelectNotification: onSelectNotification);
  }

  onDidReceiveLocalNotification(
      int id, String? title, String? body, String? payload) {
    print('onDidReceiveLocalNotification payload is 👉 $payload');
    didReceiveLocalNotificationStream.sink.add(
      ReceivedNotification(
        id: id,
        title: title,
        body: body,
        payload: payload,
      ),
    );
  }

  onSelectNotification(String? payload) {
    if (payload != null) {
      print('onSelectNotification payload is 👉 $payload');
      selectNotificationStream.sink.add(payload);
    }
  }

  // 单独出来的iOS请求权限
  requestIOSPermissions() async {
    bool? result = await flutterLocalNotificationsPlugin
        .resolvePlatformSpecificImplementation<
            IOSFlutterLocalNotificationsPlugin>()
        ?.requestPermissions(
          alert: true,
          badge: true,
          sound: true,
        );
    return result;
  }

  // 单独出来的MacOS请求权限
  requestMacOSPermissions() async {
    bool? result = await flutterLocalNotificationsPlugin
        .resolvePlatformSpecificImplementation<
            MacOSFlutterLocalNotificationsPlugin>()
        ?.requestPermissions(
          alert: true,
          badge: true,
          sound: true,
        );
    return result;
  }

  // 显示 消息
  show(ReceivedNotification receivedNotification) async {
    const AndroidNotificationDetails androidPlatformChannelSpecifics =
        AndroidNotificationDetails(Config.channelId, Config.channelName,
            channelDescription: Config.channelDesc,
            importance: Importance.max,
            priority: Priority.high,
            ticker: 'ticker');
    const NotificationDetails platformChannelSpecifics =
        NotificationDetails(android: androidPlatformChannelSpecifics);
    await flutterLocalNotificationsPlugin.show(
      receivedNotification.id,
      receivedNotification.title,
      receivedNotification.body,
      platformChannelSpecifics,
      payload: receivedNotification.payload,
    );
  }

  // 针对 dart 中的stream进行性能上的优化,回收内存
  dispose() {
    didReceiveLocalNotificationStream.sink.close();
    selectNotificationStream.sink.close();
  }
}
在全局get_it进行实例化:
// ...
import 'package:my_app/utils/notifications_utils.dart';

final getIt = GetIt.instance;

void setupGetIt() {
  // ...
  getIt.registerSingleton<NotificationsUtils>(NotificationsUtils());
}
# 如何测试呢?
消息是异步的,可以在main.dart中进行测试:
void main() async {
  setupGetIt();
  // getIt.registerSingleton<WebSocketUtils>(WebSocketUtils(Config.wsUrl));
  // WebSocketUtils webSocketUtils = getIt<WebSocketUtils>();
  NotificationsUtils notificationsUtils = getIt<NotificationsUtils>();
  // 请求消息权限
  Timer(Duration(seconds: 0), () async {
    await notificationsUtils.requestIOSPermissions();
    await notificationsUtils.initNotifications();
    await notificationsUtils.show(ReceivedNotification(
        id: 1,
        title: '测试消息的title',
        body: '测试消息的body', // payload部分会包含title与body,并且会传递type类型
        // 微信 -> 图片 -> [图片]
        // 1.type 解析
        // 2.download图片 -> 缩略图
        // 3.点击图片 ->
        payload: "{'title':'mytest', 'body': 'mybody'}..."));
    notificationsUtils.selectNotificationStream.stream.listen((event) {
      print('event is 👉 $event');
    });
  });

  runApp(MyApp());
}
# 声音与震动
震动需要一个第三方库进行支持:
dependencies:
  # 震动
  vibration: ^1.7.4-nullsafety.0
在Storage中全局存储消息的静音与声音(同理,也可以针对不同的用户进行存储):
import 'package:get_storage/get_storage.dart';
// ...

enum StoreKeys {
  // ...
  isMute,
  isVibrate,
}

class Storage {
  static Storage _storage = Storage._internal();
  final GetStorage _box = GetStorage();

  GetStorage get box => _box;

  Storage._internal();

  factory Storage() => _storage;

  // common set & get
  void write<T>(StoreKeys key, T value) => _box.write(key.toString(), value);

  T read<T>(StoreKeys key) => _box.read(key.toString());

  // setToken, getToken
  setToken(String token) => _box.write(StoreKeys.token.toString(), token);
  String? getToken() => _box.read<String>(StoreKeys.token.toString());
}
需要调整show方法时候的逻辑:
// 显示 消息
show(ReceivedNotification receivedNotification) async {
  // isMute false-有声音, true-静音
  bool isMute = Storage().read(StoreKeys.isMute) ?? false;
  // isVibrate 控制震动
  bool isVibrate = Storage().read(StoreKeys.isVibrate) ?? false;
  AndroidNotificationDetails androidPlatformChannelSpecifics =
    AndroidNotificationDetails(
    Config.channelId,
    Config.channelName,
    channelDescription: Config.channelDesc,
    importance: Importance.max,
    priority: Priority.high,
    ticker: 'ticker',
    playSound: !isMute,
  );
  IOSNotificationDetails iosNotificationDetails =
    IOSNotificationDetails(presentSound: !isMute);
  NotificationDetails platformChannelSpecifics = NotificationDetails(
    android: androidPlatformChannelSpecifics, iOS: iosNotificationDetails);
  await flutterLocalNotificationsPlugin.show(
    receivedNotification.id,
    receivedNotification.title,
    receivedNotification.body,
    platformChannelSpecifics,
    payload: receivedNotification.payload,
  );
  if (isVibrate && (await Vibration.hasVibrator() ?? false)) {
    // 震动
    Vibration.vibrate();
  }
}
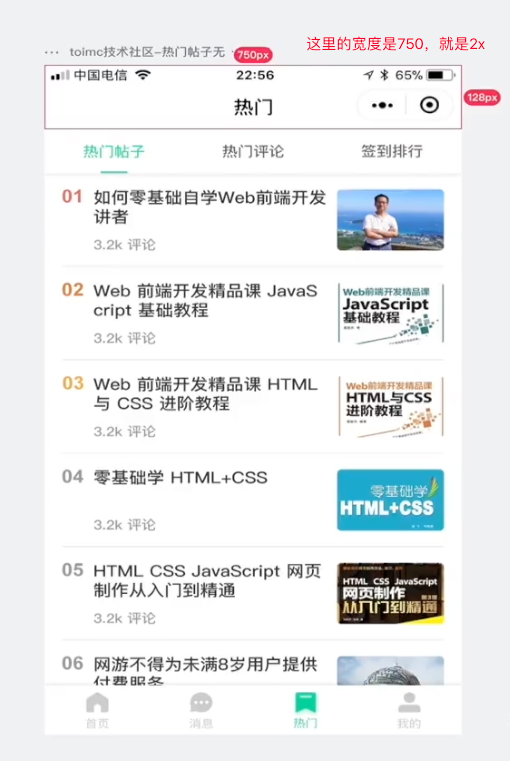
# 首页导航
# 屏幕适配
flutter 屏幕适配方案,让UI在不同尺寸的屏幕上都能显示合理的布局!
依赖项:
dependencies:
  flutter_screenutil: ^5.1.1
官方中文文档:https://github.com/OpenFlutter/flutter_screenutil/blob/master/README_CN.md (opens new window)
基础的概念:
| 属性 | 类型 | 默认值 | 描述 |
|---|---|---|---|
| designSize | Size | Size(360, 690) | 设计稿中设备的尺寸(单位随意,建议dp,但在使用过程中必须保持一致) |
| builder | Widget Function() | Container() | 一般返回一个MaterialApp类型的Function() |
| orientation | Orientation | portrait | 屏幕方向 |
| splitScreenMode | bool | true | 支持分屏尺寸 |
| minTextAdapt | bool | false | 是否根据宽度/高度中的最小值适配文字 |
| context | BuildContext | null | 传入context会更灵敏的根据屏幕变化而改变 |
关于设计尺寸,一般是2x的设计尺寸:
初始化,修改main.dart文件:
class MyApp extends StatelessWidget {
Widget build(BuildContext context) {
return MaterialApp(
debugShowCheckedModeBanner: false,
title: 'Flutter_ScreenUtil',
theme: ThemeData(
primarySwatch: Colors.blue,
),
home: HomePage(title: 'FlutterScreenUtil Demo'),
);
}
}
class HomePage extends StatefulWidget {
const HomePage({Key key, this.title}) : super(key: key);
final String title;
_HomePageState createState() => _HomePageState();
}
class _HomePageState extends State<HomePage> {
Widget build(BuildContext context) {
//设置尺寸(填写设计中设备的屏幕尺寸)如果设计基于360dp * 690dp的屏幕
ScreenUtil.init(
BoxConstraints(
maxWidth: MediaQuery.of(context).size.width,
maxHeight: MediaQuery.of(context).size.height),
designSize: Size(360, 690),
context: context,
minTextAdapt: true,
orientation: Orientation.portrait);
return Scaffold();
}
}
ScreenUtil.init只需在home或者根路由(即第一个flutter页面)中调用一次即可。
注意:不支持在
MaterialApp的theme的textTheme中使用字体适配。——非常好理解,那时候该插件还未初始化完成。
大前端的项目中如何初始化:
// ...
return MaterialApp.router(
  routeInformationParser: _rootRouter.defaultRouteParser(),
  routerDelegate: _rootRouter.delegate(),
  builder: (_, child) {
    ScreenUtil.init(
      BoxConstraints(
        maxWidth: MediaQuery.of(_).size.width,
        maxHeight: MediaQuery.of(_).size.height),
      designSize: Size(750, 1334),
      // 默认的屏幕方向
      orientation: Orientation.portrait,
    );
    // 示例,防止返回null
    return child != null ? child : Container();
  },
);
使用方法:
传入设计稿的dp尺寸
    ScreenUtil().setWidth(540)  (sdk>=2.6 : 540.w)   //根据屏幕宽度适配尺寸
    ScreenUtil().setHeight(200) (sdk>=2.6 : 200.h)   //根据屏幕高度适配尺寸(一般根据宽度适配即可)
    ScreenUtil().radius(200)    (sdk>=2.6 : 200.r)   //根据宽度或高度中的较小者进行调整
    ScreenUtil().setSp(24)      (sdk>=2.6 : 24.sp)   //适配字体
    12.sm   // 取12和12.sp中的最小值

    ScreenUtil.pixelRatio       //设备的像素密度
    ScreenUtil.screenWidth   (sdk>=2.6 : 1.sw)   //设备宽度
    ScreenUtil.screenHeight  (sdk>=2.6 : 1.sh)   //设备高度
    ScreenUtil.bottomBarHeight  //底部安全区距离,适用于全面屏下面有按键的
    ScreenUtil.statusBarHeight  //状态栏高度 刘海屏会更高
    ScreenUtil.textScaleFactor //系统字体缩放比例

    ScreenUtil().scaleWidth  // 实际宽度设计稿宽度的比例
    ScreenUtil().scaleHeight // 实际高度与设计稿高度度的比例

    ScreenUtil().orientation  //屏幕方向

    0.2.sw  //屏幕宽度的0.2倍
    0.5.sh  //屏幕高度的50%
如果Flutter的sdk是大于等于2.6(sdk>=2.6)的,可以使用扩展函数:
Container(
  width: 50.w,
  height:200.h
)
等价:
Container(
  width: ScreenUtil().setWidth(50),
  height:ScreenUtil().setHeight(200),
)
简洁了好多。
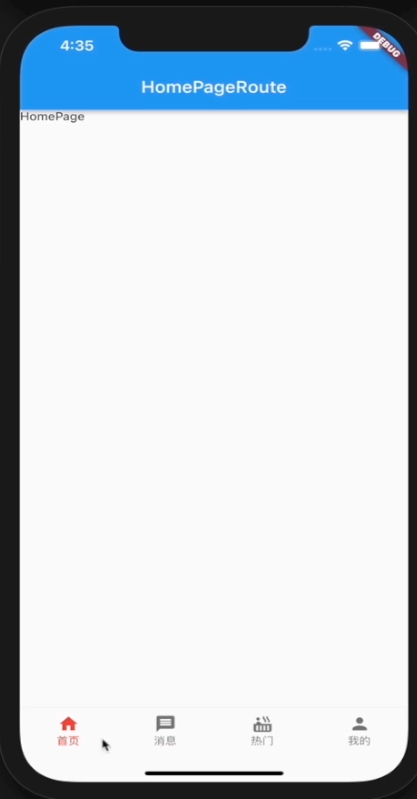
# 底部导航
本节完成的最终效果:
步骤:
升级auto_route至3.x的版本:
dependencies:
  # ...
  # 自动路由
  auto_route: ^3.0.1

dev_dependencies:
  # ...
  # 自动路由
  auto_route_generator: ^3.0.1
新建4个测试页面首页、消息、热门、我的:
import 'package:flutter/material.dart'; class HomePage extends StatelessWidget { const HomePage({Key? key}) : super(key: key); Widget build(BuildContext context) { return Container( child: Text('HomePage'), ); } }创建首页的
routes.dart页面import 'package:auto_route/auto_route.dart'; import 'package:my_app/pages/home/detail_page.dart'; import 'package:my_app/pages/home/home_page.dart'; const homeTab = AutoRoute( path: 'home', page: EmptyRouterPage, name: 'HomeTab', initial: true, children: [ AutoRoute( path: '', page: HomePage, ), AutoRoute( path: ':id', page: DetailPage, meta: {'hideBottomNav': true}, ) ], );说明:多页面的路由,可以写在统一的文件夹下,也可以写在各个文件中,根据自己的喜好来定。
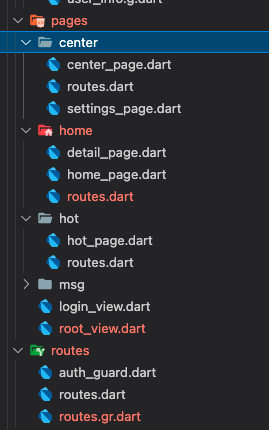
总路由文件
routes/routes.dart:import 'package:auto_route/auto_route.dart'; import 'package:my_app/pages/center/center_page.dart'; import 'package:my_app/pages/center/routes.dart'; import 'package:my_app/pages/center/settings_page.dart'; import 'package:my_app/pages/home/home_page.dart'; import 'package:my_app/pages/home/routes.dart'; import 'package:my_app/pages/hot/hot_page.dart'; import 'package:my_app/pages/hot/routes.dart'; import 'package:my_app/pages/login_view.dart'; import 'package:my_app/pages/msg/msg_page.dart'; import 'package:my_app/pages/msg/routes.dart'; import 'package:my_app/pages/root_view.dart'; ( routes: <AutoRoute>[ AutoRoute( page: RootView, path: "/", children: [ homeTab, // 这个其实有点像嵌套路由?是吧! msgTab, hotTab, centerTab, ], ), AutoRoute(page: LoginView, path: "/login"), // AutoRoute(page: HomeView, path: "/home-view/:id", guards: [AuthGuard]), ], ) class $AppRouter {}修改
root_view.dart文件:import 'package:auto_route/auto_route.dart'; import 'package:flutter/material.dart'; import 'package:flutter_screenutil/flutter_screenutil.dart'; import 'package:my_app/routes/routes.gr.dart'; class RootView extends StatelessWidget { const RootView({ Key? key, }) : super(key: key); Widget build(BuildContext context) { return WillPopScope( onWillPop: () async => false, child: AutoTabsScaffold( appBarBuilder: (context, tabsRouter) { // 这里的AutoBackButton也是一个auto_route的组件 return AppBar( title: Text(context.topRoute.name), leading: AutoBackButton()); }, routes: [ HomeTab(), MsgTab(), HotTab(), CenterTab(), ], bottomNavigationBuilder: buildBottomNav, ), ); } Widget buildBottomNav(BuildContext context, TabsRouter tabsRouter) { // 控制底部是否显示 -> 有点像企业微信、钉钉等应用 final hideBottomNav = context.topRouteMatch.meta['hideBottomNav'] == true; return hideBottomNav ? SizedBox.shrink() : BottomNavigationBar( currentIndex: tabsRouter.activeIndex, onTap: tabsRouter.setActiveIndex, // 这里是控制切换的缩放效果 type: BottomNavigationBarType.fixed, // 使用前置的适配方案screenutil selectedFontSize: 22.sp, unselectedFontSize: 22.sp, selectedItemColor: Colors.red, items: [ BottomNavigationBarItem( icon: Icon(Icons.home), backgroundColor: Colors.black, label: '首页', ), BottomNavigationBarItem( icon: Icon(Icons.message), label: '消息', ), BottomNavigationBarItem( icon: Icon(Icons.hot_tub), label: '热门', ), BottomNavigationBarItem( icon: Icon(Icons.person), label: '我的', ), ], ); } }
# 下拉刷新(上拉加载)
下拉刷新是移动端应用中最普通、最常见的场景,推荐的第三方库有:
- pull_to_refresh(推荐)
- flutter_easyrefresh
它们都有中文的文档,下面来看看如何实现首页列表的下拉刷新:
安装依赖
dependencies:
  # 下拉刷新 + 上拉加载
  pull_to_refresh: ^2.0.0
基本使用,调整lib/pages/home/home_page.dart
import 'dart:async';
import 'package:flutter/cupertino.dart';
import 'package:flutter/material.dart';
import 'package:my_app/entity/content/post.dart';
import 'package:my_app/services/content_service.dart';
import 'package:my_app/setup_get_it.dart';
import 'package:pull_to_refresh/pull_to_refresh.dart';
class HomePage extends StatefulWidget {
const HomePage({Key? key}) : super(key: key);
State<HomePage> createState() => _HomePageState();
}
class _HomePageState extends State<HomePage> {
ContentService contentService = getIt<ContentService>();
List<String> items = ["1", "2", "3", "4", "5", "6", "7", "8"];
RefreshController _refreshController =
RefreshController(initialRefresh: false);
List<Post>? _lists;
void initState() {
super.initState();
// 方法一:Timer
Timer(Duration.zero, () async {
_lists = await contentService.getPostList();
setState(() {});
});
}
Widget? body;
void _onRefresh() async {
// 往头部加数据
// newData数据库请求回来的数据
// _lists = <Post>[]
// ..addAll(newData)
// ..addAll(_lists??[]);
// monitor network fetch
await Future.delayed(Duration(milliseconds: 1000));
// if failed,use refreshFailed()
// 告诉插件已经刷新完成
_refreshController.refreshCompleted();
}
void _onLoading() async {
// monitor network fetch
await Future.delayed(Duration(milliseconds: 1000));
// 判断,返回的数组长度与length的关系来去决定执行loadNoDat还是loadComplete
// length < limit loadNoData
// length == limit loadComplete
// if failed,use loadFailed(),if no data return,use LoadNodata()
items.add((items.length + 1).toString());
if (mounted) setState(() {});
_refreshController.loadNoData();
}
Widget build(BuildContext context) {
// pull_to_refresh的自带组件:
return SmartRefresher(
enablePullDown: true,
enablePullUp: true,
header: WaterDropHeader(
complete: Container(),
// 关闭过渡效果
completeDuration: Duration.zero,
),
footer: CustomFooter(
// 自定义脚部显示的文字
builder: (context, mode) {
if (mode == LoadStatus.idle) {
body = Text("上拉加载");
} else if (mode == LoadStatus.loading) {
body = CupertinoActivityIndicator();
} else if (mode == LoadStatus.failed) {
body = Text("加载失败!点击重试!");
} else if (mode == LoadStatus.canLoading) {
body = Text("松手,加载更多!");
} else {
body = Text("没有更多数据了!");
}
return Container(
height: 55.0,
child: Center(child: body),
);
},
),
controller: _refreshController,
onRefresh: _onRefresh,
onLoading: _onLoading,
child: ListView.builder(
itemBuilder: (context, index) =>
Card(child: Center(child: Text(_lists![index].title))),
itemExtent: 100.0,
itemCount: _lists?.length ?? 0,
),
);
}
}
需要注意,sqflite如果是一直插入数据,可能会导致数据重复,如何避免?
调整content_provider.dart:
  addPostBatch(List<Post> lists) async {
    try {
      final db = await database;
      Batch batch = db.batch();
      lists.forEach((element) {
        batch.insert(
          'posts',
          element.toJson(),
          // 如果主键冲突,直接忽略即可
          conflictAlgorithm: ConflictAlgorithm.ignore,
        );
      });
      var res = await batch.commit();
      return res;
    } catch (err) {
      print('err is 👉 $err');
    }
  }
# 长列表异步数据方案
上面的章节,介绍了下拉刷新与上拉加载,但是对于异步大量的数据,使用数组的方案,效率低下,而且可能会带来性能问题。如果是长列表异步数据,就需要借助原生组件 StreamBuilder和FutureBuilder 了。
首先,需要调整接口服务,返回特定的Post性能数据:
class ContentService {
  // 获取文章列表
  Future<List<Post>> getPostList([ListQuery? query]) async {
    Map<String, dynamic> params = query?.toJson() ?? {};
    Response res = await DioHttp().get('/public/list', params);
    if (res.statusCode == 200) {
      HttpResponse httpResponse = HttpResponse.fromJson(res.data);
      if (httpResponse.code == 200) {
        List<Post> lists =
            httpResponse.data.map<Post>((e) => Post.fromJson(e)).toList();
        // print('lists is 👉 $lists');
        await ContentProvider.db.addPostBatch(lists);
        return lists;
        // var res2 = await ContentProvider.db.getPost('5fde262d7f2fcb6844ada5a9');
        // print('res is 👉 $res1');
        // print('res is 👉 $res2');
      }
    }
    return <Post>[];
  }
}
在home_page.dart中使用:
Widget build(BuildContext context) {
return FutureBuilder<List<Post>>(
future: _getData(),
// FutureBuilder -> future -> 执行一次
// StreamBuilder -> stream -> 执行多次 -> streamControler.sink.add
builder: (context, snapshot) {
if (snapshot.hasData)
return SmartRefresher(
enablePullDown: true,
enablePullUp: true,
header: WaterDropHeader(
complete: Container(),
completeDuration: Duration.zero,
),
footer: CustomFooter(
builder: (context, mode) {
if (mode == LoadStatus.idle) {
body = Text("上拉加载");
} else if (mode == LoadStatus.loading) {
body = CupertinoActivityIndicator();
} else if (mode == LoadStatus.failed) {
body = Text("加载失败!点击重试!");
} else if (mode == LoadStatus.canLoading) {
body = Text("松手,加载更多!");
} else {
body = Text("没有更多数据了!");
}
return Container(
height: 55.0,
child: Center(child: body),
);
},
),
controller: _refreshController,
onRefresh: _onRefresh,
onLoading: _onLoading,
child: ListView.builder(
itemBuilder: (context, index) =>
Card(child: Center(child: Text(_lists![index].title))),
itemExtent: 100.0,
itemCount: _lists.length,
),
);
return CupertinoActivityIndicator();
},
);
}
这里的_getData()如下:
ContentService contentService = getIt<ContentService>();
// 定义页面数据
List<Post> _lists = <Post>[];

Future<List<Post>> _getData() async {
  _lists = await contentService.getPostList();
  return _lists;
}